
Syslog Data Export
HYAS Protect provides powerful functionality for exporting DNS logs in CEF format directly to a Syslog server, which seamlessly integrates with SIEM and SOAR platforms. This option eliminates the need to store DNS logs in cloud storage, as you can send them directly to your preferred Syslog server. This integration allows security teams to enhance their existing security data with HYAS Protect’s advanced DNS intelligence, offering deeper insights into potential threats. By exporting DNS logs in this manner, organizations can significantly improve their threat analysis and incident response capabilities, leading to more proactive and informed decision-making. The process is simple, ensuring that crucial DNS data is readily accessible for thorough security monitoring and automated response actions within SIEM and SOAR systems.
Requirements
HYAS Protect
Syslog Server (not provided by HYAS)
Configuring Syslog Data Export
DNS logs are exported in CEF, all logs regardless of verdict are exported.
Begin by logging into HYAS Protect and navigating to the Settings Menu.
From there, select “Syslog Data Export”
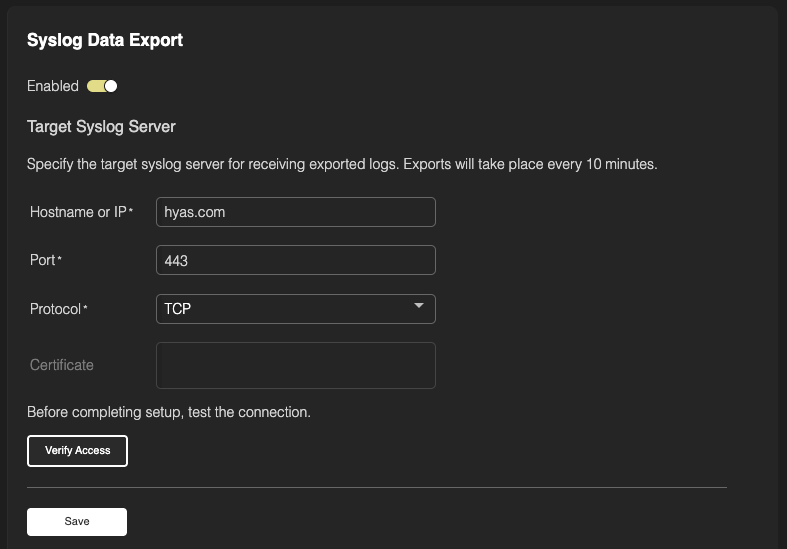
Toggle the data export to “Enabled”
For your Syslog Server, enter the following details:
Hostname or IP (required)
Port (required)
Protocol (required)
TCP: Transmission Control Protocol. Ensures reliable delivery of logs but uses more overhead compared to UDP. Transmits data in clear text.
TLS: Adds an additional layer of security to TCP by encrypting the data prior to transmission. Adds additional overhead through the encryption/decryption process.
It is highly recommended that you copy and paste your certificate in the appropriate box when using TLS.
UDP: Is connectionless meaning that it does not guarantee delivery nor error checking. No built in security features but is very fast with low latency.
Next, click on ‘Verify Access'
If the setup works properly, you’ll receive a green “Details Verified Successfully” notification at the top of the screen.
If connection with the S3 Bucket was unsuccessful, you’ll receive a red error at the top of the page noting the likely issue.
Once you’ve configured your setup properly, select “Save” and your all set!
Data is exported approximately every 10 minutes.
Additional Syslog Configuration Details
Source IP Whitelisting
If your network restricts inbound traffic, you may need to allowlist the following IP addresses to ensure successful delivery of Syslog data:
40.87.158.7252.178.213.244