
Windows
Overview
The HYAS Protect Agent (HPA) empowers organizations to leverage the robust capabilities of HYAS Protect on their roaming devices. Functioning as a DNS Proxy, the HPA offers a straightforward, lightweight, and highly effective solution to extend the full benefits of HYAS Protect to your mobile workforce.
This page will review the HPA installation procedure for a Windows machine. We’ll give you both UI and PowerShell options along with some troubleshooting steps if you get stuck along the way.
Architecture
The HPA consists of two parts, a service and a UI (user interface)
Service/Backend: The service, also known as the backend, is responsible for the core functionality and logic of the Agent.
The UI, also known as the front end, is the part of the application that users interact with.
For purposes of this document, when referring to the HPA, we mean the service and the UI together.
Starting the Agent UI
By default, the Agent’s UI will not launch upon install however, the HPA service is running and protecting your machine in the background.
The HPA UI provides feedback, status updates and other information related to the HPA. If you wish to start the UI to view these, please perform the following steps:
To start the HPA UI,
Navigate to the search bar and type HYAS Protect
Click on HYAS Protect

Checking Agent Status
When checking status, keep in mind that the HPA communicates with the HYAS Protect backend approximately every 5 minutes, so statuses may not appear immediately in the HYAS Protect SaaS UI.
HYAS Protect SaaS UI
Administrators may check the status of all HPA’s from the ‘Manage’ tab in the ‘Protect Agent’ section of the HYAS Protect SaaS UI.
Login to HYAS Protect, click on Settings>Organization Settings> Protect Agent> Manage.
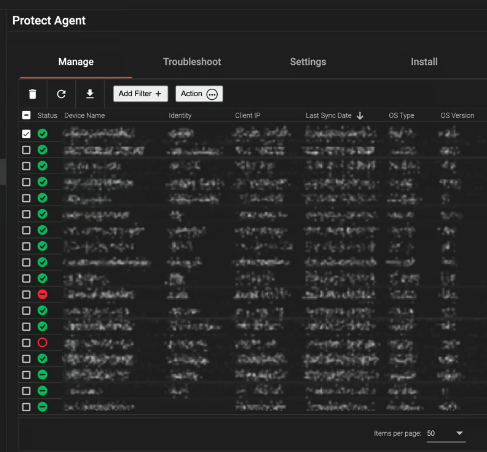
From this view, you can check the ‘Status’ column to get information on the status of all the Agents.
HYAS Protect Agent UI
It is also possible to check the status of the HPA on the local machine itself.
By default, the Agent’s UI will not launch, but rest assured, the service will still be running and actively protecting your machine whether the UI is open or not.
Ensure the HPA UI is running.
If you do not see the HYAS in the system tray, the HPA UI is not running. This does not mean that HYAS Protect is not protecting the machine. This only means the UI is not running.
To start the HPA UI follow the instructions listed above under ‘Starting The Agent UI’
With the UI running, click on the HYAS icon in the system tray.
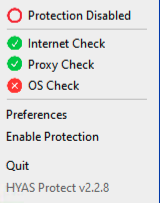
You’ll be presented with the following window:
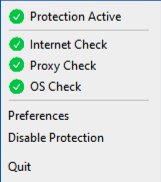
Green means everything has passed checks and is working properly. Red signifies that there is an issue with the status and further troubleshooting may be required.
Additionally, you may check Services to ensure the HPA is running
Agent Status Definitions
Protection Active
This shows the overall status of the Agent.
Internet Check
The HYAS Protect service performs the DNS query directly to the HYAS Protect cloud resolver. If this works, the service can reach the internet and can reach the HYAS Protect cloud backend.
Proxy Check
The HYAS Protect service performs the DNS query to 127.0.0.1:53. If this works, the service is correctly listening on 127.0.0.1:53, and can reach the internet and the HYAS Protect cloud backend.
OS Check
The HYAS Protect service asks the OS to perform the DNS query. If this works, the OS is configured to use 127.0.0.1:53 for DNS, the service is correctly listening on 127.0.0.1:53, and can reach the internet and the HYAS Protect cloud backend.
Agent Preferences
The HPA on the local machine includes configurable preferences to provide greater flexibility, visibility, and advanced troubleshooting. To access Preferences, start by navigating to the system tray and click on the HYAS Protect icon.
Once you click on Preferences, you’ll see the three options below:
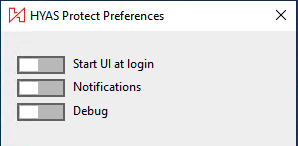
Start UI at login
Enabling this will ensure that the GUI is started on machine login.
The HPA will still run in the background - and be protecting your machine - regardless whether the UI is running or not.
Notifications
Turning this on allows the Protect Agent to send you notifications regarding connectivity or errors that may have occurred.
Debug Mode
Toggling this on can be useful if you’re having issues with your Agent. This feature enables additional logs to be collected for Client Admin or HYAS analysis.
Disabling/Enabling the Agent
Disabling
There are a few different options to “Turn off” the Agent. Let’s dive into the differences.
Disabling the UI only
This turns the UI off but allows the HPA to still run in the background.
Click on the HYAS Protect icon in the Menu Bar to access the settings. You’ll see the following popup.
Clicking “Quit” here will turn off the HYAS Protect UI.
The HPA will still run in the background - and be protecting your machine - regardless whether the UI is running or not.
Re-enabling the UI only
If the HYAS icon is missing from the Menu Bar, it means the UI isn’t running.
To start the UI, see instructions above titled, ‘Starting the Agent UI’
Disabling Protection Locally
If you wish to disable the HPA completely, you must stop the service itself.
This will completely stop HYAS Protect from running and it will no longer be protecting your machine.
Click on the HYAS icon in the Menu Bar.
Select, ‘Disable Protection’
This will disable the HPA completely for a period of 5 minutes.
If you are unable to select ‘Disable Protection’, your Administrator must toggle the feature on via the HYAS Agent Central Management Console. Instructions for Admins on completing that here.
Re-enabling Protection Locally
The HPA will automatically restart after 5 minutes. However, if you wish to restart the HPA sooner perform the following:
Navigate to the HYAS Logo in the Menu Bar, click on it and select ‘Enable Protection’
This will re-enable the HPA to begin protecting your device again.
Disabling Protection via the HPA Central Management Console
HYAS Protect Admin privleges are required to manage agents in the Central Agent Management Console.
Navigate to the ‘Manage’ tab of HPA Central Agent Management Console.
Select the Agent(s) you wish to disable by selecting the check box next to the Agent(s) and selecting the ‘Action’ button
 at the top of the screen or by selecting the Actions icon
  at the right of the page.
 Then select ‘Disable Agent'
This will disable the Agent indefinitely. The HPA must be manually re-enabled before it can resume protecting the selected devices.
Confirming the Agent’s Running State
By default, the Agent runs in the background and automatically protects your machine upon installation. However, if you’d like to confirm that it’s running, you can do so by following one of the procedures below:
By default, the Agent’s UI will not launch, but rest assured, the service will still be running and actively protecting your machine whether the UI is running or not.
If the UI is NOT running (default state)
Start the Agent’s UI by following the instructions above under ‘Starting the Agent UI’.
If the UI is running
Navigate to the system tray at the bottom of the screen and you should see:

The H with the solid dot signifies that the HPA, (both service and UI is up and running).
Updating the Agent
Like all software, regular updates are crucial for fixing bugs, adding new features, and improving client experience and overall security. The update method for the HPA may differ depending on the version, so please refer to the instructions below for details specific to your version.
Regardless of the update method, HYAS STRONGLY recommends using a phased rollout approach. This involves updating a few machines at a time, testing them, and then proceeding with additional updates. This standard practice for software updates helps ensure easier troubleshooting and minimizes the risk of widespread issues.
Agent v2.2.7 and Newer
If you machine(s) are currently on HPA v2.2.7 or newer, you may update to newer versions (2.2.8+), directly from the HYAS Protect SaaS UI.
Navigate to HYAS Protect, click on Settings>Organization Settings> Protect Agent> Manage.
Select the machine(s) you which to update (ensuring they are running v2.2.7 or newer)
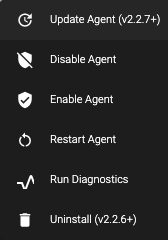
Click on ‘Action’

Then select ‘Update Agent (v2.2.7)’
Allow up to 15 minutes for the updates to complete.
Agent v2.2.6 and Older
If you have HPA v2.2.6 or older you will not have in-place updating capabilities until you’ve updated to v2.2.7+. This means, you need to manually update your agents.
However, if you are updating to v2.2.5 or newer, it will automatically look for older versions of the HPA dating back to at least 2.1.1 and automatically uninstall the older version as part of the update process.
In all other cases, please manually uninstall the older HPA per the instructions below. For installation, follow the instructions listed above for downloading and installing the HPA.
Uninstalling the Agent
v2.2.6 and Newer
If your machines are running v2.2.6 or later, the easiest way to uninstall the HPA is through the ‘Manage’ tab in the HYAS Protect SaaS UI
Navigate to HYAS Protect>Settings>Organization Settings>Protect Agent>Manage
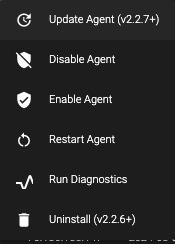
From the ‘Manage’ tab, select the machines you wish to uninstall the Agent from, click on ‘Action’ and select ‘Uninstall (v2.2.6+)’
After approximately 5 minutes, the HPA will be uninstalled from the desired machines.
v2.2.5 and Older
Older versions of the HPA require a different procedure, although this method will also work on newer versions as well.
Navigate to the search bar and type “Add or Remove Programs”

Click on “Add or Remove programs”.
This will take you to the “Apps & features” section.
Search for HYAS Protect in the list.
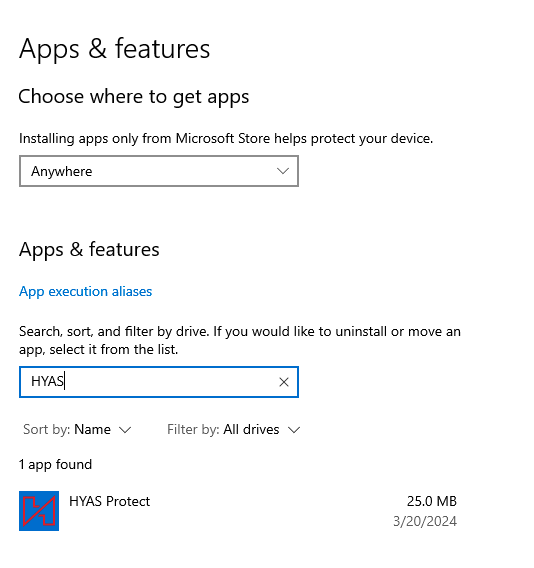
Click on HYAS Protect and select Uninstall.
Follow the prompts to fully uninstall HYAS Protect.