
Relay Deployment
HYAS Protect Relay (Beta)
The HYAS Protect Relay is currently in beta. While it is available for early access and testing, it may be subject to change and is not yet recommended for production-critical environments. We welcome feedback during this phase to help refine its performance, stability, and feature set.
Overview
The HYAS Protect Relay serves as a strategic solution designed to complement resolver-based deployments. In traditional resolver setups, clients face restrictions as they are unable to access information about private IPs or device names internal to the network; only external or egress IPs are visible.
To address this, the HYAS Protect Relay is a service installed in your network to gather DNS telemetry and relay it back to HYAS Protect. This innovation facilitates:
Visibility: Visibility into internal IP addresses to better analyze which devices/users are making specific DNS requests.
Policy Enforcement at IP or Subnet Level: Empowering users to enforce policies with granularity at the IP or subnet level.
Improved Logging: Enhancing the logging capabilities to provide more comprehensive and insightful data.
Compatibility Across Platforms: Extending compatibility to macOS, Windows, and Linux, ensuring a versatile and inclusive solution.
Compatibility
The HYAS Protect Relay for Windows Server is supported on Windows Server 2019 (Long-Term Servicing - LTSC) and newer.
Installation Methodology
In order for the HYAS Protect Relay to be effective, it must be installed in front of your other DNS infrastructure, either physically or logically. This way the Relay can:
Receive metadata associated with DNS queries, including the IP address and device name of originating machine.
Forward local/internal traffic to your local DNS resolver(s) and send external requests to HYAS Protect.
To implement this, there are two installation methods:
If your internal DNS resolver is a Windows Server configured with the “DNS Server” role, installing the HYAS Protect DNS Relay on this server is likely the most ideal solution.
Installing the HYAS Protect Relay on a standalone Windows Server is effective, but it requires updating the DHCP server configuration to provide the relay's IP address as the DNS service.
Installation
Once you’ve determined which installation methodology suits your organization, it’s time to install the Relay.
Start by contacting HYAS to obtain the .msi file at support.hyas.com or reach out to your HYAS technical counterpart.
Once you’ve downloaded the installer, locate the downloaded ZIP file on your computer and extract its contents by right-clicking on the file and selecting “Extract All” from the context menu.
Open the folder that contains the extracted files and look for the installer file. The file extension will be .msi.
Double-click the installation file to begin the installation process.
The installer wizard will launch, and you will be presented with a series of prompts to guide you through the installation process.
Follow the prompts, and when you see an input field titled “Install Key”, enter your organization’s install key and click “Next”.
Note: the install key can be found on the HYAS Protect portal
(https://apps.hyas.com) at Settings > Organization Settings HYAS Protect Agent > Install > Install Key.
Configuration
Configuring Relay Usage of Port 53
Port 53 on each IP address supports only one listening process, in accordance with standard IP network design. For the HYAS Protect Relay to manage incoming DNS traffic on the external interface, it must occupy this port. Depending on the configuration of local domains, it can forward requests to the Windows DNS service as needed. However, before this can occur, the Windows DNS service must stop listening on port 53.
To configure the Relay to listen on port 53:
Check which processes are listening on Port 53.
In PowerShell, run the following command to check for processes listening on port 53 and their associated IP addresses.
netstat -an | Select-String 53 | Select-String listenThis command retrieves TCP connections listening on port 53 and displays the local IP address and port. When configured properly, the output will look similar to this:
PS C:\Users\Administrator> netstat -an | Select-String 53 | Select-String listen
TCP     0.0.0.0:5357      0.0.0.0:0       LISTENING
TCP     127.0.0.1:53      0.0.0.0:0       LISTENING
TCP     [::]:5357         [::]:0          LISTENING
TCP     [::1]:53          [::]:0          LISTENING
TCP     [fe80::608c:dc7e:e701:f49f%14]:53      [::]:0       LISTENING
In this output above, port 53 is currently utilized by the localhost IPv4 (127.0.0.1), localhost IPv6 (::1), and the fe80:xxx IPv6 address. However, the Windows DNS server is not configured to listen on the IP address of the domain controller (10.0.10.98).
Adjust the Windows DNS Server properties to ensure it does not listen on the IP address of the domain controller, and configure it to listen on localhost port 53 instead.
Open Windows Server Manager and right-click and select DNS Manager.
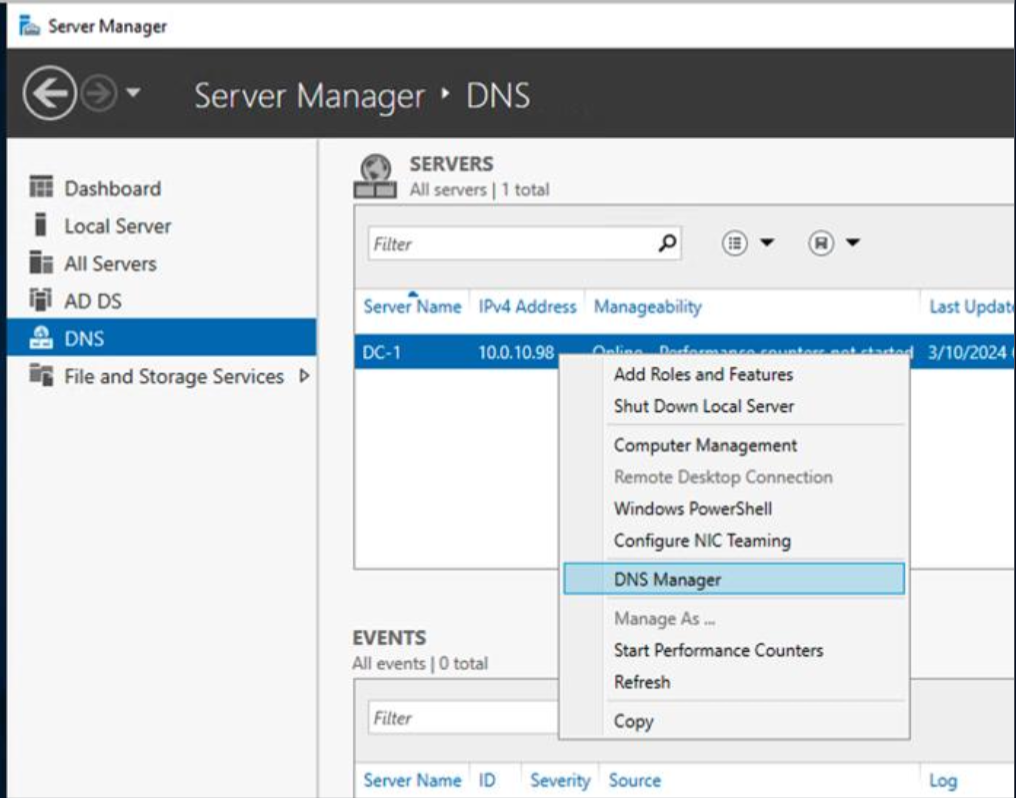
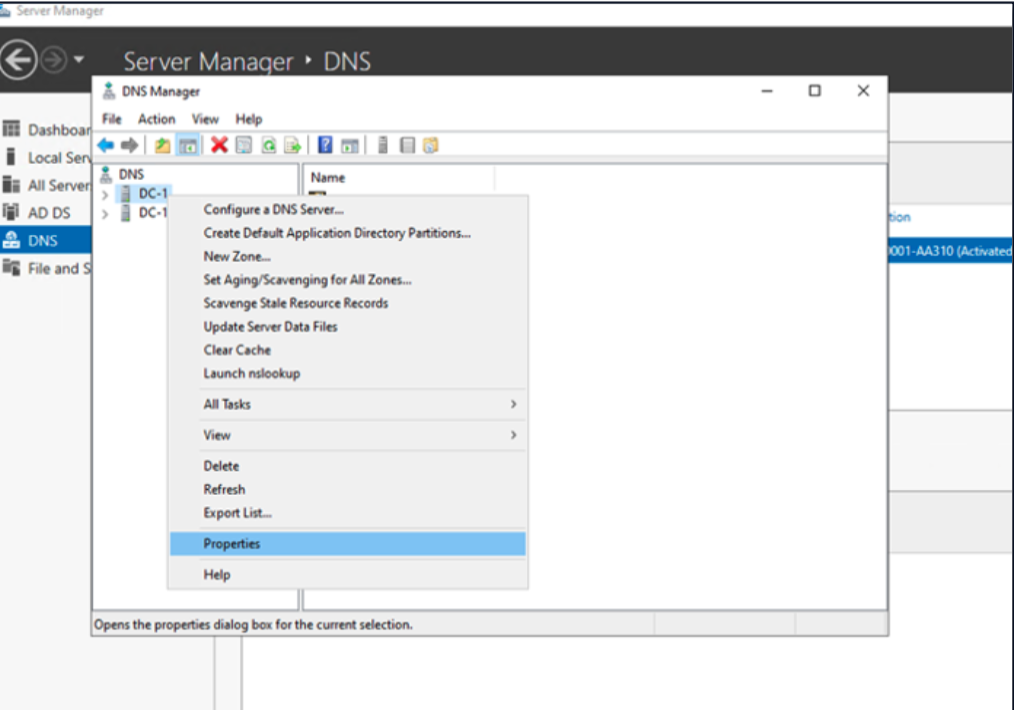
From here, you should see all your DNS Servers. Right-click each one and select Properties.
Select the Interfaces tab.
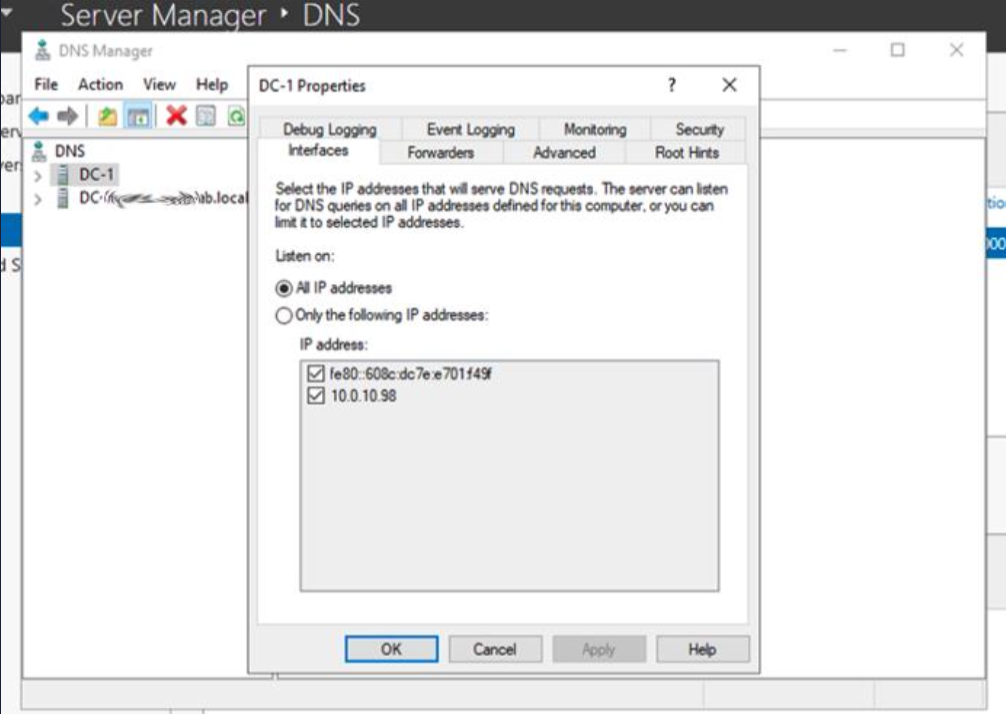
In this example, we’ll need the Windows DNS Server to stop listening on 10.0.10.98. To do this, unselect the check box next to 10.0.10.98 and click OK.
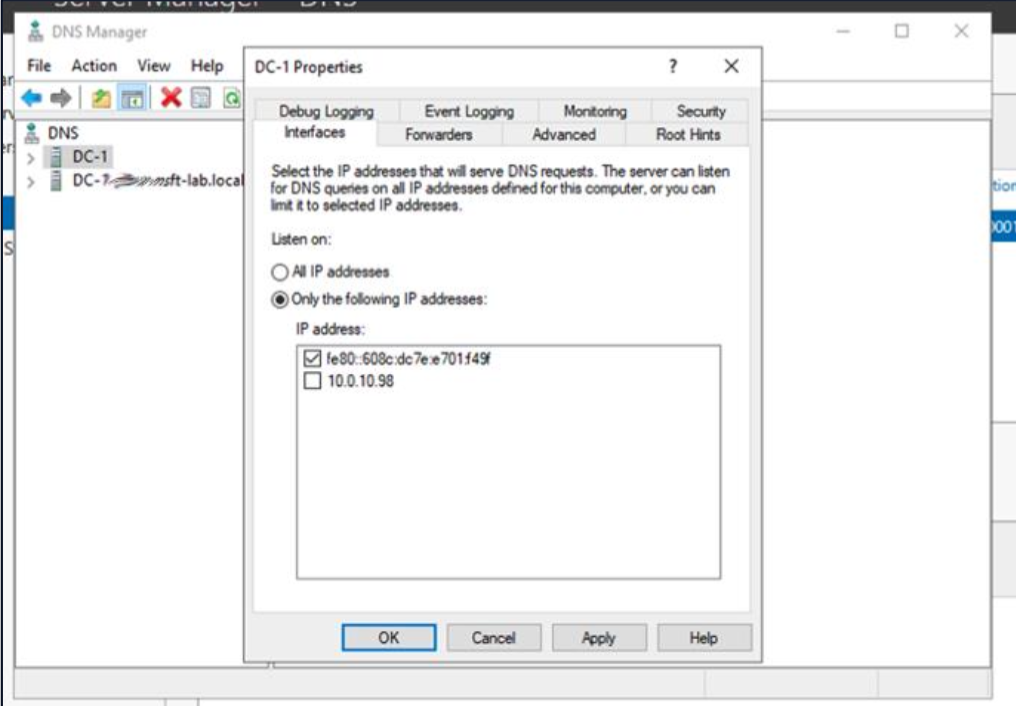
You may beed to restart the DNS service for the changes to take effect.
Although not explicitly displayed in the user interface, it's important to note that the Windows DNS server also listens on port 53 of the IPv4 localhost (127.0.0.1) and IPv6 localhost (::1).
Update the dnsproxy.yaml file to bind the HYAS Protect DNS Relay service to the domain controller's IP address (10.0.10.98) and configure upstream DNS settings for both local and non-local domains.
dns: bind_hosts: - 10.0.10.98 port: 53 upstream_dns: - https://20.84.20.79/dns-query - https://52.250.62.155/dns-query - "[/your-local-domain-here/]127.0.0.1:53"
The bind_hosts configuration binds the HYAS Protect Relay service to port 53 on the IP address 10.0.10.98, enabling it to accept DNS requests. The upstream_dns settings example shown above ensure that requests for local domains are forwarded to 127.0.0.1:53, where the Windows DNS server is operational. For this, replace “your-local-domain-here”with your actual local domain, and add additional lines for each additional local domain if needed.
Additionally, the first two lines under upstream_dns in the example shown above ensures that DNS queries for non-local domains will be routed to the HYAS Protect resolvers and thus shown in the HYAS Protect portal.
If you have a cluster of domain controllers, you will need to assign a secondary IP addresses to the domain controllers for replication purposes (and subsequently select the secondary IP addresses in DNS Manager) to leave the primary IP address (that is handed out by DHCP) to be used by the HYAS Protect Relay.
HYAS Protect Relay deployments that are not installed on a domain controller may choose to bind the HYAS Protect Relay service to all IPv4 and all IPv6 interfaces. To do so, set the following bind_hosts configuration in the dnsproxy.yaml file:dns: bind_hosts: - 0.0.0.0 - '::'
Disabling the HYAS Protect Relay
To disable (stop) the HYAS Protect Relay, run the following PowerShell command:
Stop-Service -Name "protect-relay"To re-enable (start) the HYAS Protect Relay, run the following PowerShell command:
Start-Service -Name "protect-relay"Uninstalling the UltraDDR DNS Relay for Windows Server
To uninstall the HYAS Protect Relay, re-run the original MSI installer and select “Remove”.
If you’re having issues deploying the HYAS Protect Relay, please navigate to the HYAS Protect Relay Troubleshooting Guide for more details.